Back to TheWorxHub for Senior Living Main Menu
Adding a Biomed Work Order
TheWorxHub allows you to create a Biomed work request or a work order. A work request is generally entered by a staff member and then approved and accepted as a work order by the responsible department. If the work you are entering does not need to be approved, you can enter it directly as a work order. You can enter a Biomed work order by first searching for the asset or location.
How to Add a Biomed Work Order
- From the Dashboard, click on the Biomed tab.
- Click on the Add button in the top right corner of the screen and select Work Order from the drop-down menu.
Asset-Based Work Order
- Select the Asset Based Work option to start the work order by searching for the asset.
- Locate the asset using criteria such as the Asset Name/Description, Barcode #, Asset Location, Category, Subcategory, Manufacturer, Model, or Serial #.
- Select the asset from the list to link it to the work order.
- Select a Priority for the work order.
- Click the Subscribe to email updates link to receive updated notifications for this work order.
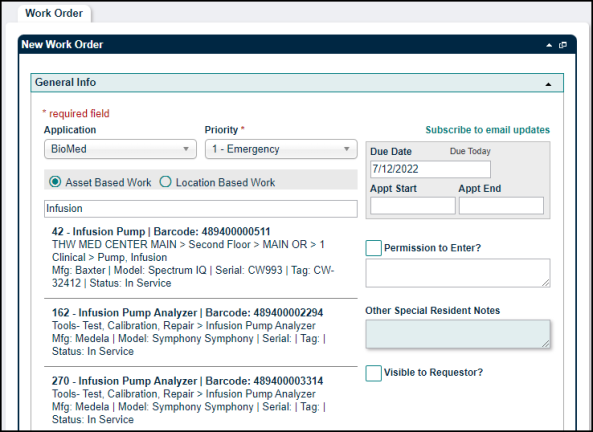
- To choose a different asset for the work order, click the Search again? link. *Note: Only one asset can be linked to a Biomed work order.
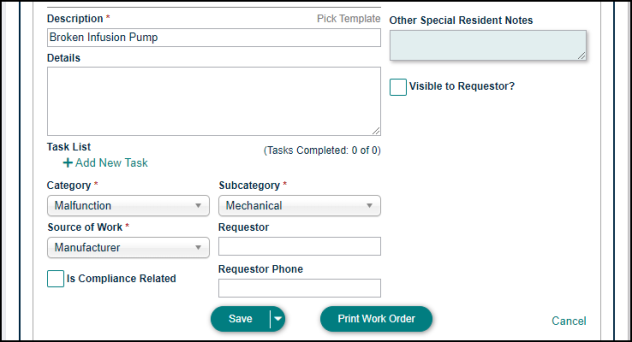
- Enter a Description of the work that needs to be performed.
- Type any additional details and notes in the Details box. *Note: This is an optional step. We highly recommend filling in as much detail as possible. However, if you choose to skip this step, you can enter detailed step-by-step instructions in the Task List.
- Click on Add New Task to choose what type of tasks you would like to add.
- In the window that appears, select a Task Type from the drop-down menu, and then click the plus sign icon (
 ). *Note: You are able to add different task types to the task list.
 - The information you enter in the task field will depend on the Task Type you select:
- Checkbox: This option is common for simple task lists where each step is documented, and you want to track which tasks have been completed vs. not completed.
- Number form data input: This option is used when you need to capture a measurement, but there is no requirement to link that input to any sort of corrective action, such as capturing the volts of the generator.
- Text form data input: This option is used when you need to input free form text data, such as the start time of when you began the generator test, or capturing a qualitative value on the condition of the equipment.
- Barcode scan: This is a unique task type where you can specify that step 1 require you to scan the asset barcode for the equipment that you're working on. This helps to prove that a technician was actually at the required location. * Note: You can only complete a barcode task type from your mobile device where barcode scanning is supported.
- Meter Reading: This option is used when you need to capture a reading on a pre-existing meter, such as water temperatures thresholds or odometer reading incremental meters. *Note: Meter reading style tasks can trigger action from a meter based scheduled work order.
- Pass/Fail: This task type will automatically trigger a corrective work order template from the failure. Because this question type requires you to leverage a pre-existing template, it's important to review any pass/fail tasks to ensure an appropriate template exists and it linked to the task.
- Add as many tasks as needed and click Save when you're finished.
- Select a Category to specify the type of work being done. Then select a Subcategory to further describe the work. *Note: The Category you select will determine the Subcategories listed in the pick list.
- Choose a Source of Work from the pick list.
- Check the Is Compliance Related box if the work will be performed to fulfill a compliance requirement. *Note: The Is Compliance Related box is only visible for users with the Can See Compliance Checkbox permission in User Roles Settings.
- Enter the name of the Requestor and the Requestor Phone number.
- Expand the work order panels by clicking on the panel title and enter any information as needed.
- Click Save.
Location-Based Work Order
- Click the Start With Location option to start the work order by searching for the location.
- Click on the Location Picker (
 ) to select a location for the work order.
- If you have access to the Space Management application, click the map pin icon (
 ) to select a location from a floor plan drawing. *Note: If you do not currently have this application, please contact your Sales Representative or Client Services for more information.
- If you have access to the Space Management application, click the map pin icon (
- Select a Priority for the work order.
- Click the Subscribe to email updates link to receive updated notifications for this work order.
- Enter a Description of the work that needs to be performed.
- Type any additional details and notes in the Details box. *Note: This is an optional step. We highly recommend filling in as much detail as possible. However, if you choose to skip this step, you can enter detailed step-by-step instructions in the Task List.
- Click on Add New Task to choose what type of tasks you'd like to add.
- In the pop-up window, select a Task Type from the drop-down menu, and then click the plus sign icon (). *Note: You are able to add different task types to the task list.
- The information you enter in the task field will depend on the Task Type you select:
- Checkbox: This option is common for simple task lists where each step is documented, and you want to track which tasks have been completed vs. not completed.
- Number form data input: This option is used when you need to capture a measurement, but there is no requirement to link that input to any sort of corrective action, such as capturing the volts of the generator.
- Text form data input: This option is used when you need to input free form text data, such as the start time of when you began the generator test, or capturing a qualitative value on the condition of the equipment.
- Barcode scan: This is a unique task type where you can specify that step 1 require you to scan the asset barcode for the equipment that you're working on. This helps to prove that a technician was actually at the required location. * Note: You can only complete a barcode task type from your mobile device where barcode scanning is supported.
- Meter Reading: This option is used when you need to capture a reading on a pre-existing meter, such as water temperatures thresholds or odometer reading incremental meters. *Note: Meter reading style tasks can trigger action from a meter based scheduled work order.
- Pass/Fail: This task type will automatically trigger a corrective work order template from the failure. Because this question type requires you to leverage a pre-existing template, it's important to review any pass/fail tasks to ensure an appropriate template exists and it linked to the task.
- Add as many tasks as needed and click Save when you're finished.
- Select a Category to specify the type of work being done. Then select a Subcategory to further describe the work. *Note: The Category you select will determine the Subcategories listed in the pick list.
- Choose a Source of Work from the pick list.
- Check the Is Compliance Related box if the work will be performed to fulfill a compliance requirement. *Note: The Is Compliance Related box is only visible for users with the Can See Compliance Checkbox permission in User Roles Settings.
- Enter the name of the Requestor and the Requestor Phone number.
- Expand the work order panels by clicking on the panel title and enter any information needed.
- Click Save.
